This post contains affiliate links.
Did you ever spend hours burnishing your leather edges trying to make them perfect? We used to cry whenever it got to the edge finishing. But now we show you how we burnish our leather easily every time.
Many problems with leather burnishing arise from using chrome-tanned rather than veg-tanned leather. Best results come from veg-tanned leathers because you may skip edge coating and keep excellent smooth natural finishes. Edge coating or edge paint may peel off or wear out over time.
We show you what to do to eliminate costly mistakes and reduce the time it takes for your edge finishing.
We always aim to use veg-tanned leather in all of our products because you may burnish them more naturally. When I say naturally I mean that we don’t need to use any edge coating made from plastics, mainly acrylics. Plastics will degrade over time and this is why we say burnishing without them makes our pieces more natural. We find they also look better and provide a highly durable finish that our customers appreciate.
Edge Coating Peels and Cracks Over Time
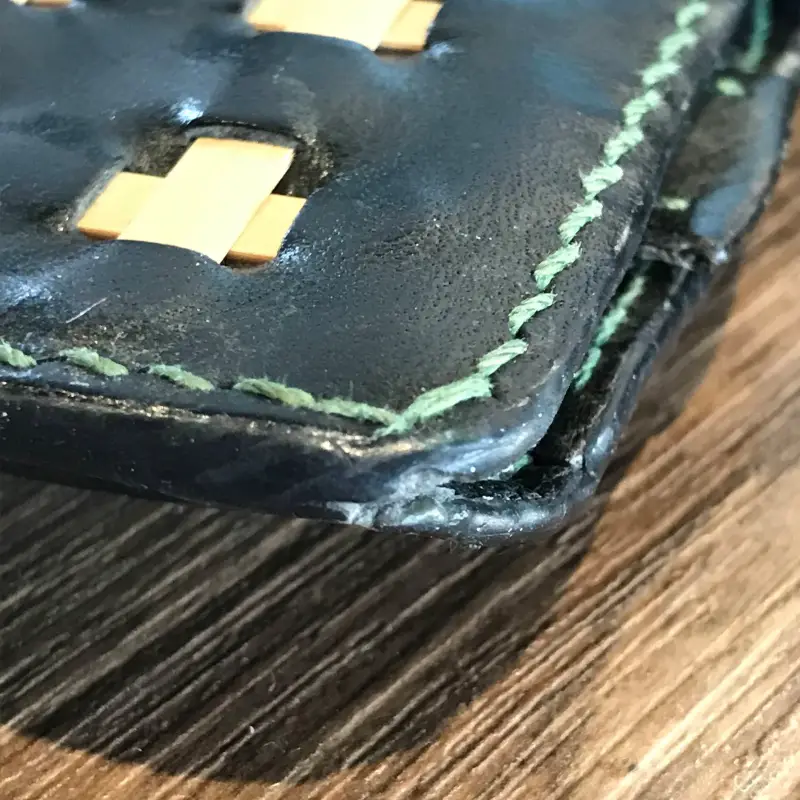
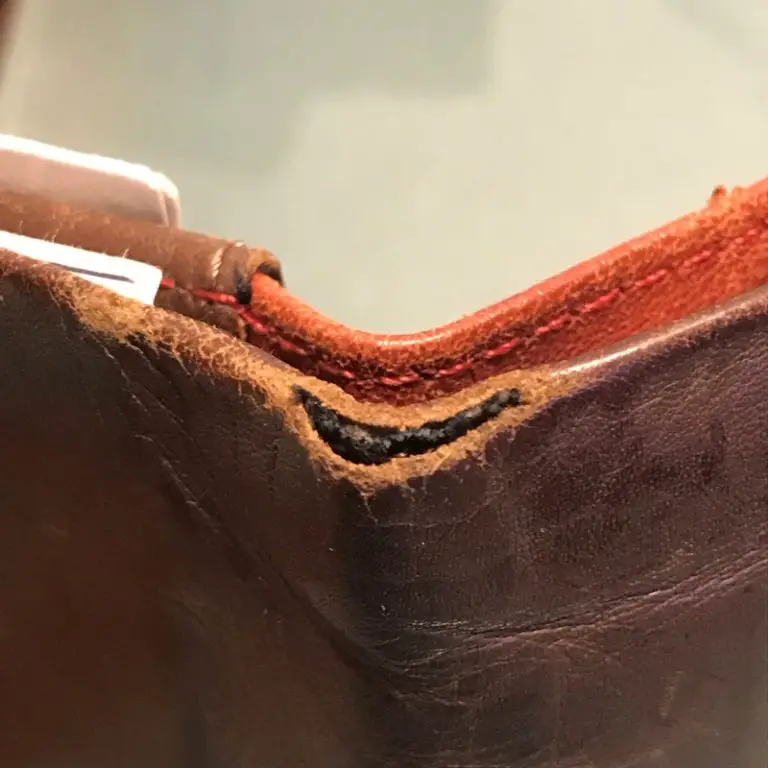
Our experience with edge painting was that over time, customers used to complain about the edge coating. They said the edge paint was cracking and peeling. So we made this design change to our range of products and eliminated the edge coating process. This improved the overall quality and also reduced a significant amount of time in our production process. Not only do you have to prepare the edges for leather edge paint, but you need to do multiple layers. In the past, we used edge coating because we had multiple layers of chrome-tanned and veg-tanned leather. And since chrome tanned leather is not easily burnished, we had to use edge paint.
The time-consuming parts of the edge coating process can be trimming the leather, sanding the edges, and then multiple layers of edge paint. And depending on the condition of the edge you might need to use a clear edge paint in the beginning to cover the large gaps between layers or different materials. Perhaps the glue between the layers was not applied well enough and the gaps create even more trouble during sanding. If this is the case, you will need to apply many coats of edge paint.
In between each layer after drying, you will also need to sand the edges. This all adds up to some serious time and hassle. The problems with leather burnishing chrome-tanned pieces are numerous enough to rethink our design to eliminate this process.
Redesign Layers to Eliminate Edge Painting and Coating Needed
If you have the opportunity, then we suggest redesigning your layers to eliminate the need for edge coating. This means you should use only leathers that are easily burnished with gum tragacanth (GT) or something similar and don’t require edge coating, like veg-tanned leather. If you want to know more about GT read this informative article about this natural and non-toxic substance used to burnish leather.
We normally use Tokonole, a Japanese brand of GT, from Seiwa and you can check it out here at this link to Amazon for a nice-sized bottle. We always buy the big bottle and then pour it into multiple smaller bottles to make sure it doesn’t dry out.
Overall, don’t use chrome-tanned leathers in your design that will make an edge. You can save countless hours and the hassles of dealing with edge coating and painting. A nice burnished leather edge with only gum tragacanth is so much more natural and will last longer. Making your leather pieces only from veg-tanned leather eliminates your production hassles of edge coating and results in a more natural and durable product!
Below is a list of what you can and cannot do besides burnishing chrome-tanned leathers. From our standpoint, it just isn’t usable for many reasons as can be seen below.
| Properties | Chrome Tanned | Veg-Tanned |
| Can be burnished? | No, not well | Yes |
| Can you dye it? | Poorly | Yes |
| Dyed throughout? | No | Yes |
| Can you bevel the edges? | Poorly | Yes |
| Use edge paint? | Yes | Yes, but don’t need |
| Can you skive it? | Poorly | Yes |
| Use Gum Tag seal? | Not really | Yes |
| Can be laser cut | No | Yes |
Use Cutting Dies for Your Leather Pieces
If you already use cutting dies and molds for preparing your leather pieces then you can skip this section. But if you are still cutting your leather by hand, then read on. It’s best to use a cutting tool that will produce leather pieces to an accurate dimension. And especially when the pieces will need to be matched and sewn together. Your edges will be so much easier to glue together and be ready for leather burnishing. A good edge can improve not only your burnishing but also your marking for stitching and punching. That will also lead to beautiful seams if you hand sew all your leather pieces.
Many problems with leather edge burnishing come from uneven edges and gaps created by hand-cut pieces of leather. If this is not an option, then at least you have to make one of the layered pieces slightly wider than the other. Then they will be ready for skiving, which is another recommendation for getting better leather edge burnishing results. After skiving, you can cut off the remnants nicely along the edges. This method will at least make your edges slightly better for sanding and preparation for burnishing.
Skiving Your Edges to Make Them Thin
Skiving your edges is another tip to make sure your leather edges are ready for burnishing and are not too thick or too thin! It’s easy to say but you will achieve better results when the edges are skived before you put your layers together. We use a leather bell skiver to do our edges and they make excellent uniform results. If you skive by hand, it will be hard to achieve such even results and this can also lead to other problems down the line. But after skiving the edges, make sure to glue the pieces together, let them dry and then you can cut off the leather that is sticking out.
The problem with thick edges, for example over 1.6mm per layer, is they tend to look bulky and not as elegant. For our leather designs, we try to make sure they are thinner than this. Because when you double them up and glue them, they become 3.2mm in thickness. But this is our preference and we do realize that every particular designer might have their reasons for thicker edges. Our experience with thinner edges is the leather burnishing results are more refined.
A word of caution though, if your edges are too thin and you are using soft leather your edges are extremely hard to burnish. They will be too floppy and will not be easy to position or hold in place to push down on and burnish. You need the edges to be rather rigid and upright for a good motion for leather burnish.
You can see this video of a gentleman doing a good job of thin edge burnishing.
EDGE BURNISHING THIN LEATHER
Edge beveling reduces problems with burnishing
Once your layers are dried from gluing it’s best to use an edge beveler to take off the sharpness along your edges. This is done to make sure that when you start burnishing the edges, they have been rounded or beveled and will produce are more clean look. Without beveling they will look like they are smashed upwards toward the surface of the leather. It’s what happens when you cut material. There will always be a sharp edge at the top and bottom of the layers.
The edge beveler is round and once you bevel your edges, they also become more rounded and can form to the tool as you push and pull it across the edge of your workpiece. Some people may skip this step to reduce the time needed for their bag, but we always bevel the edges. It’s especially important to do this if you do not use edge paint since the edge coating will cover that.
Problems of Sewing before Burnishing
After you have prepared your layers and pieces for this process, what we do is make sure the edges are all well pressed, aligned, and glued. Because if they’re not, the sewing and following steps will just amplify any imperfections or problems. And if you spot a problem now, you still have an easier chance of fixing it. We don’t usually run into any issues during this step. But if you hand or machine sew there might be some minor problems. But most don’t lead to any burnishing problems as far we know. Once your piece is sewn and you have hammered your stitches flat you are ready for the next step, sanding!
Edge Sanding Before Burnishing
The last step we do before dyeing the edges is sanding. The better a job you do in the preceding steps will reduce the time and amount of leather you need to sand off. One point we’d like to highlight is that you might have multiple layers of veg-tanned leather. However, they should all be from the same leather or nearly the same color or shade. When it’s time to dye your edges during the next step, you will choose a dye to match or be just a little darker than your leather color.
If you have multiple colors or the shades are very different, you will run into problems with the dye not being able to cover the range of colors. Or you will see light and dark lines in your layers. And this is probably not the look you are aiming for. You want the layers to be as uniform as possible so you can’t even tell there are layers of leather on the edges. That will be the mark of a truly well-designed leather piece. Yes, we know, some makers don’t even finish their edges, and that’s up to them!
For our leather edges, we use a powered sander to achieve consistently good burnished edges. Check out the link for a unit that has both burnishing dics and a sander on the opposite side.
Dyeing the Edges before Burnishing
Some leather artisans skip dyeing the edges and just go to burnishing. However, we suggest this is a good way to reduce problems with your edges, have nice consistent uniform colors, and a beautiful edge ready for sealing from moisture and water. Aniline dyed leather will be nicer since they are already dyed all the way through, but we choose a dye that matches the surface as closely as possible. This should cover and make the edges look like 1 solid piece of leather if you’ve done all the previous steps well.
Marcello is a participant in the Amazon Services LLC Associates Program, an affiliate advertising program designed to provide a means for sites to earn advertising fees by advertising and linking to Amazon.com. We also participate in other affiliate programs which compensate us for referring traffic.