This post contains affiliate links.
If you’re new to leather sewing or not you’re always looking for new techniques, especially on how to finish a stitch. Well, once you see this new way of finishing your stitching, you might never want to do a normal backstitch again.
Three holes before the end, stitch with 1 needle from the front side and alternate hole, and finish by coming through the last hole to the backside. Using the backside needle, do the same, but stop before the last hole. Create a knot and pull through the front side. This locks the stitch in place.
Now let me give you a little more detail because it’s hard to write about how to stitch leather but I’ll do my best to explain it in simple terms.
Determine the front and back of your workpiece
The first step before you finish off your leather stitching is to determine which is the front side of your piece. And which is the backside of your piece. Because we will utilize a very neat and small locking knot for you to finish off your workpiece. This is important because you will pull the knot and have it just sit in the last hole as you pull it towards the front surface. And then you will go back one hole, pull it through and finish off on the backside.
So as mentioned you need to start this process three holes before the end of your stitching. That means you’ll have one needle on the front side and one needle on the backside in a standard saddle stitching. So to be clear this method is only for when you are doing saddle stitching or using two needles.
The needles we use on a regular basis are John James 004 needles and we share a link to them here. They are the size 4 which is 42mm in length x 0.80mm in diameter. It’s best to use this size and make sure your stitching holes are not the rounded type.

Start with Frontside Needle And Finish On The Backside
Now you will take the needle from the front side and begin stitching just with the one needle through all 3 holes. Alternating by first going through to the backside. Then stitch back to the front through the second hole and then still just with one needle stitch back to the backside through the third or last hole. This is not the usual way to saddle stitch, right? Usually, you go with both needles through at nearly the same time, one hole at a time right? With this special method, you go 3 holes with the front needle and then alternate with the backside needle.
Make sure however that when you are stitching with a single needle you go through the holes as you usually do so that you will still have neat and uniform stitching. We like to use the French-style pricking irons of 3.85mm because they leave a nice angled and neat look to our seams. Check out that link to a pair we think does a nice job and is an affordable set of tools.
So we follow the same direction and method of pulling our threads through the stitch holes to keep our seams looking uniform and it makes a big difference. Don’t forget to check this as you finish these last 3 stitches. If you don’t you may notice that the consistency is lost. But just back out and try again to fix the uniformity.
Next is the Backside Needle
At this point, you will have both needles on the backside but you should now start to stitch using the needle you haven’t finished off the last 3 holes with. Stitch through to the front and make sure to check how the stitching looks as mentioned before to maintain a nice neat uniform look. Then go back through the second hole to the backside. And once again make sure to check the seams on the front side are still uniform-looking. Before you go through the last hole, you will need to create a special knot.
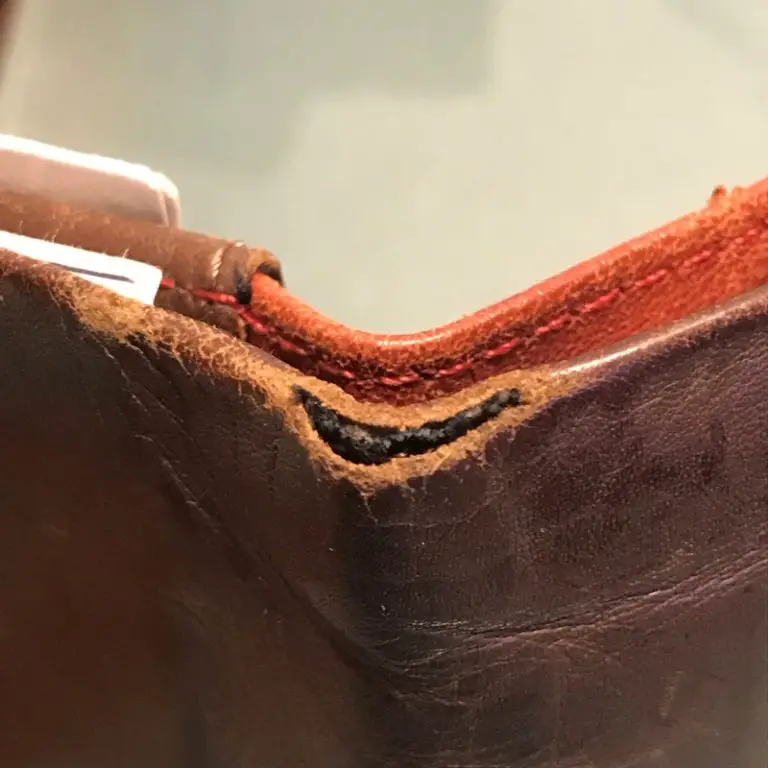
Create a Small Knot
The special knot is made so that it is going to help wedge itself in the last stitch hole. Once you make the knot by tying the 2 threads with 1 knot keep it loose as you then do the last stitch. You will notice that when you pull it through, it will automatically tighten as you pull it through. Then once the needle is on the front side, gently adjust the knot so it is on near the stitch hole, and then pull tight. You should feel it pop into the hole. If you don’t feel the pop, then adjust again and gently pull towards the back and try again. It might take some practice but you’ll get the hang of it quickly with practice.
The knot is a simple overhand knot like I’ve shown below. If you keep it loose, when you pull it through the last hole towards the front, you may need to use your nail to adjust the position or neatness of the knot. That’s why you should keep it loose. I like to think of the knot as a hidden one and it works best if the holes you make for stitching are slight and not big round holes. That’s why we use French-type pricking irons.
We link you below to the really good tools that will last. You can check which dimensions you prefer for your workpieces.
Vergez Blanchard Pricking Iron
Pull Needle and Knot to Front
Once you have pulled the knot and it is popped into place and essentially wedged into the last hole, check it to make sure it’s not out and on the front side. It should be wedged inside the hole and concealed. It should not be visible. If you see the knot on the outer surface, please adjust it and try again to make the knot wedged in the corner.
Now you can now backstitch one hole and then the final position is with both needles on the back. Now you may cut off and burn, tie off and glue or finish any way you need depending on your thread choice. This new way of sewing leather finishes off your leather pieces in a much nicer way.
Marcello is a participant in the Amazon Services LLC Associates Program, an affiliate advertising program designed to provide a means for sites to earn advertising fees by advertising and linking to Amazon.com. We also participate in other affiliate programs which compensate us for referring traffic.